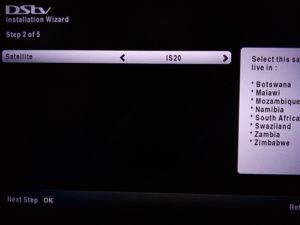
Any dstv xtraview installation you have to link the decoders together by running installation on both decoder 1 and decoder 2. Any extra view installation which consists of one decoder to be an Explora and other to be an HD decoder, all the time the Explora have to be the decoder 1 which is the primary decoder and HD have to be decoder 2, which is the secondary decoder.
After connecting your cables at the right ports of the dstv smart LNB ( unicable port A for the explora decoder and port C for the HD decoder), the next step is to run the installation wizard on both dstv decoders for them to send heartbeat signal to each other.
You have to run the installation on the primary decoder which is the explora decoder before you move on with the HD decoder which will be the secondary decoder.
With the explora decoder which will be your primary decoder if it’s a new decoder follow the steps below.
- Select your preferred language (English & Portuguese) and you press OK to the next page.
- On the satellite page if you are living in this listed countries (Botswana, Malawi, Mozambique, Namibia, South Africa, Swaziland, Zambia and Zimbabwe) you have to select the satellite name IS20 and then you press OK to the next page. And for the rest of Africa if your country name is not listed in the IS20 satellite page, you have to select E36B satellite name and then you press OK to the next page.
- On the next page select manual setup and press OK to move on to the next page.
- On the LNB page, you have to change the LNB type to be UNICABLE TM/SATCR. All the index and user band frequency have to be default the Explora will be the primary decoder so it have to be the one sending heartbeat signal to the other.
Below is the user band frequency for primary explora decoder:
LNB TYPE UNICABLE TM/SATCR
User Band Tuner 1 Frequency – 1210
User Band Tuner 2 Frequency – 1420
User Band Tuner 3 Frequency – 1680
User Band Index 1 —– 0
User Band Index 2 —– 1
User Band Index 3 —– 2


On the LNB page come down to highlights the scan option if the signal status at the right side of the page fills up it indicates that you are having enough Dstv signal. Don’t scan the decoder right away press on the back button on the remotes which will take you to the previous menu. On this menu, select quick setup and press OK to move on on the next page select decoder one and press OK to scan the dstv decoder.
If you are already using the explora decoder follow the following steps to land on the installation wizard.
- Press dstv logo on the remote and look for settings.
- Come down to satellite settings and press OK.
- Select home network and press OK.
- Come down to launch installation wizard.
On the secondary decoder which is the HD decoder if it’s new follow the steps below.
- Select your preferred language (English & Portuguese)
- choose the satellites depending on the country you are living in.
- On the satellite page if you are living in this listed countries Botswana, Malawi, Mozambique, Namibia South Africa Swaziland Zambia and Zimbabwe) you have to select the satellite name IS20 and then you press OK to the next page. And for the rest of Africa if your country name is not listed in the IS20 satellite page, you have to select E36B satellite name and then you press OK to the next page.
- On the next page select manual setup and press OK to move on to the next page.
- On the LNB page, you have to change the LNB type to be UNICABLE TM/SATCR.
Change the user band frequency to match the data below.
User Band Tuner 1 Frequency – 2040
User Band Tuner 2 Frequency – 1006
User Band Index 1 — 3
User Band Index 2 — 4


